Plank Shield
In the 13th century, there was a wide variety of shield shapes, ranging from oval and round to elongated rectangular forms. However, the triangular shape was undoubtedly the most common (Figure 1). This shape was largely determined by its suitability for mounted combat. The shield was held via a shoulder-mount system: it hung from the arm by straps, sometimes supplemented by an additional strap slung over the head. Unlike a center-grip (fist-held) shield, this mounting method allowed the rider to hold both the shield and the reins in the same hand.
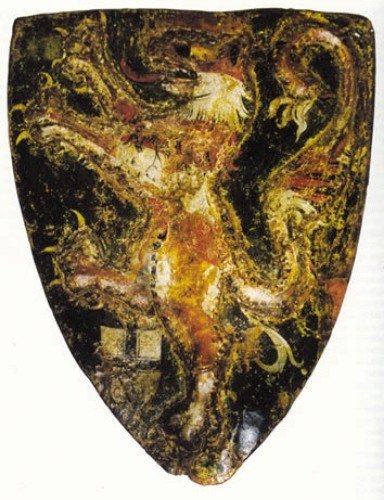
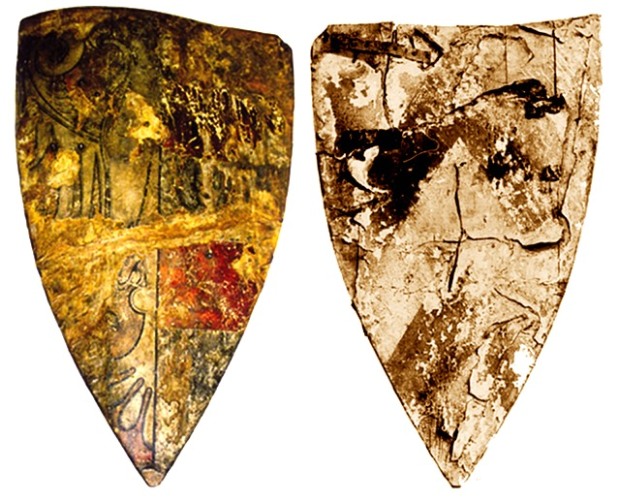
Figure 1 - Shield of Konrad von Thüringen, 1240, size 88x72.5;
Shield of the Teutonic Order Commander W. v. Lierderbach, 1300, size 93x58
It is important to understand that the shield's purpose was to protect against lance strikes; therefore, the face of the shield—rather than the edges—bore the brunt of the impact.
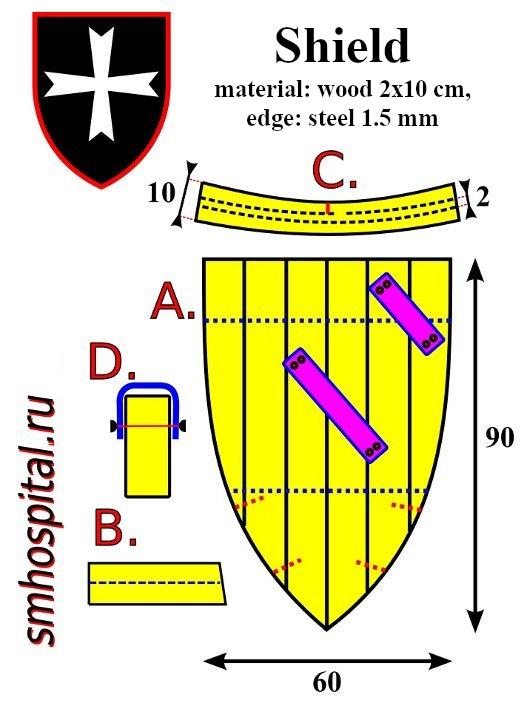
Figure 2 - Shield diagram
A. Shield base: blue dashed line – wire, red dashed line – self-tapping screws, purple – handles.
B. End view of the board: blue dashed line – wire.
C. Shield rim pattern: blue dashed line – fold line.
D. Shield rim: blue line – rim, red line – rivet.
Assembling the main body
1. Take standard factory-cut boards measuring 2x10 cm, at least 90 cm long. Pine is the best choice due to its light weight.
2. Align the boards side-by-side, mark the outline, and cut out the shape (Figure 2-A).
3. To give the shield a curved shape, plane the edges of the boards—specifically, one side of each board (Figure 2-B). Determine the angle experimentally, though it should be slight. At this stage, it is also crucial to ensure the boards fit tightly against one another.
4. Prepare two metal rods, 5–8 mm thick. These rods will pass through the boards to bind the shield together.
5. Drill holes in the boards for the rods using a drill bit that matches the rod's diameter. The placement of the rods is indicated by the blue dashed lines in Figures 2-A and 2-B.
6. Cut the rods to the width of the shield plus 5 mm. Cut threads onto the ends of the rods using a threading tool (die). The threaded section should extend approximately 1–1.5 cm from the ends.
7. Thread the boards onto the rods. Adjust them to minimize any gaps between the boards.
8. Screw nuts of the appropriate diameter onto both ends of the rods (ideally, use two nuts per end). To prevent the nuts from protruding from the shield, it is best to first drill 5 mm deep recesses into the outermost planks using a larger drill bit (matching the diameter of the nut) before inserting the rod.
9. For added strength, you can fasten the edges of the planks together using long wood screws—indicated by the red dashed lines in Figure 2-A. 10. The shield base is now ready.
Covering and Appliqué
1. Create an appliqué for the shield using a papier-mâché-like technique with strips of fabric. Assemble the appliqué directly onto the shield. While this step can be skipped for simplicity, the appliqué undoubtedly enhances the shield's appearance.
2. Cover the shield. There are two options: soaked leather or fabric (the latter is not historically accurate but is easy and inexpensive). If using fabric, simply glue 1–2 layers to the front of the shield using PVA glue. Use a coarse fabric, such as linen or cotton. Note: Covering the shield—even just with fabric—is essential; otherwise, the planks will quickly deteriorate.
A good approach is to reinforce the side edges by gluing on 5–10 additional strips of fabric before applying the main covering; this process is described in the "Rim/Binding" section.
3. Allow the glue or leather to dry.
4. Tack the fabric down along the edges using small nails.
Rim/Edge
For modern *buhurt* (mass melee) combat, a wooden shield needs a steel rim, at least along the top edge; otherwise, the wooden planks will quickly splinter from impacts. If the shield is covered in leather, you can skip the steel rim or place a thin steel strip underneath the leather.
A budget-friendly option is to cover the shield with fabric. In this case, a 1.5 mm steel rim placed over the fabric is mandatory.
The trend of edging these shields with a leather strip on all sides (as seen in Figure 3, shield 2 on the left) is fundamentally incorrect. In the 13th century, shields were covered in leather across their entire surface, not just along the rim; in my view, a discreet steel rim is the better choice.
1. Cut out the rim strip according to the template (Figure 2-C). The template's curve should represent roughly half the shield's curvature; the strip will bend further during the fitting process.
2. Gradually bend both sides along the dashed lines. The goal is a U-shaped cross-section (Figure 2-D). Do not bend one side all the way to an L-shape before attempting to bend the other; that method will not work.
3. Once the strip begins to take the shape of the rim, fit it to the shield's edge.
4. Rivet it in place using nails, as shown in Figure 2-D.
P.S. If the strip simply refuses to lie flat against the shield, you can make small cuts along the red dashed line. If this doesn't improve the situation, you can make a rim out of 2–3 overlapping sections—though this is not an ideal solution.
P.P.S. For the rimming on the other sides (except the top), simply gluing several layers of fabric (5–10 strips) on top of one another is sufficient.
Handles and painting
1. In the final stage, rivet the handles in place as shown in the diagram. The handles should be made of thick sole leather (*cheprak*) and secured with two rivets on each side. If you use only one rivet, the handle will wobble and inevitably come off at the worst possible moment.
2. Paint the shield.
In conclusion, I would like to note that shields of this type are somewhat fragile; it is best to use them only for events or trips.
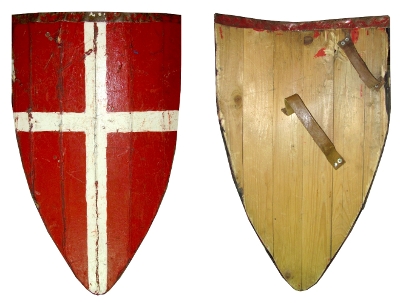
Figure 3 – Finished shield
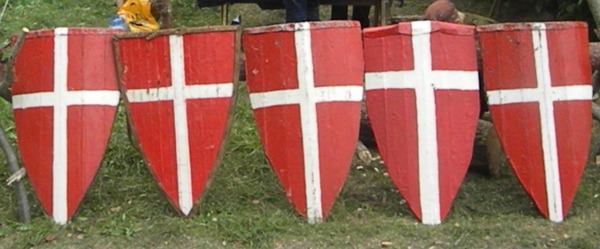
Figure 4 – Shields
Автор © Enton, 2010
Comments (6)