Mail mittens, 13th century

Making:
1) Weave the mail panel following the shape of the padded mitten in its bent state, so that its edge reaches the palm on all sides. The upper panel will be noticeably longer than the mitten.
The direction of weaving must be the same as on the sleeves of the hauberk, so that later the mittens can be woven on.
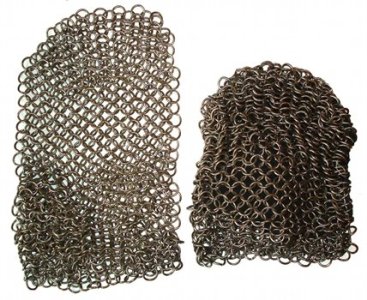

Figure 1 - Mail panel for the mitten (left) and a mail panel of the same size gathered with a cord (right).

2) Thread a leather cord through the rings along the edge of the panel.
3) Baste the cord with the panel to your padded mitten along the edge of the palm and thumb with a contrasting thread.
4) Make sure the padded mitten has not lost its flexibility and that the mail on top does not prevent freely bending the hand into a fist and moving the thumb. If this is not so - enlarge the panel.
5) Make a paper pattern of the palm - press the paper to the palm of the padded mitten with the basted mail panel and trace along the outline of the cord. The pattern will roughly match the palm of the padded mitten.
6) Cut the palm out of thin leather and baste it along the edge of the cord with a thread of another colour. Baste it exactly to the cord, without sewing it to the mitten.
7) Remove the thread with which the leather cord is basted to the padded mitten. Now the mail mitten can be taken off the padded one.
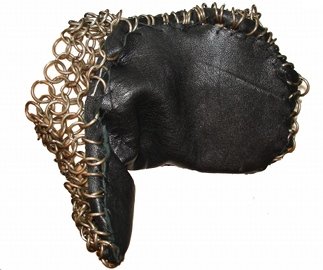
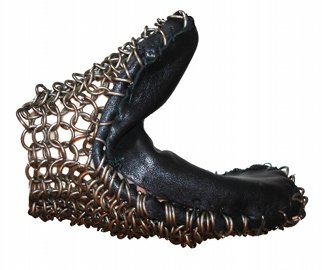
Figure 2 - Mail mitten with the basted palm, separate from the padded one.

8) Having made sure the mail mitten easily comes off and goes onto the padded one, securely sew the cord to the leather palm, making a knot every 2-3 stitches (if the thread breaks in one place, the whole mitten will not come apart).
9) Make a slit across the mitten at the base of the palm. The slit must be made so that it coincides with the slit on the padded mitten, so the hand can be easily taken out.
10) Weave the mitten onto the long-sleeved hauberk. If needed - lengthen the sleeves of the hauberk so that movement is not constrained. Naturally, before the final weaving, it is worth experimenting by weaving the mitten to the sleeve for 3-4 rings and so determining the best position.

Author © Enton, 2009

Comments (6)

Enton · 04.06.2010 22:07
Пришивать кольчугу к рукавице не исторично на 13 век. Лучше уж просто в стеганой рукавице.
Roland · 03.06.2010 23:18
а может лучше пришить к стеганой рукавице и не приплетать / пришивать больше ни к чему.<br>оно же мешаеться сильно. а кольчугу. я к примеру, делать как то не хочу )= да и долго.
Enton · 12.05.2010 14:19
Если подвижность теряется, после пришивания стеганой рукавицы к стеганке, значит проблема там - уменьшете толщину стеганки на запястье.<br>Если после того, как вы поверх стеганки одеваете кольч с приплетенными кольчужными рукавицами - вероятно нужно удлинить рукав (или расширить?). Действительно - кольч с рукавицей не должен мешать сгибать кисть: для проверки длины согните руку в локте на максимум и оттопырте кисть назад - кольч с рукавицей не должен мешать такому положению. В диаметре колец проблема врядли.<br>Хочу сказать - у нас не одна такая стеганка и кольч с приплетеными рукавицами - никому не сковывает.
Brand · 10.05.2010 21:36
Доброго времени суток!<br>Сделал себе стеганые и кольчужные рукавицы, руководствуясь вашим сайтом. Подвижность руки, увы, теряется... Рукавицу приплетал к кольчуге с кольцами 10 x 2, может быть дело в кольцах?
IronFort · 02.05.2010 19:56
Ну судя по надгробиям количество приделаных варешков к гамбещонам это далеко не 99 процентов... Ну а приплетённые кольчужные варежки это да.... это "наше всё" <br>))
Enton · 27.01.2010 15:15
Я не очень понял ваш вопрос.<br>Во первых набивняков вообще не было.<br>Во вторых 99% стеганок в 13с были с приделаными к ним стегаными рукавицами.<br>В третьих 99% кольчуг в 13с были с приплетенными кольчужными рукавицами.